
Ceiling fans have been a household staple for decades, but they have evolved far beyond their early days as simple air movers. Today, they come in a wide variety of designs, finishes, and functions—making them both a practical and stylish addition to any space. Whether you’re choosing a low-profile ceiling fan for a compact room, exploring an outdoor ceiling fan with light for your patio, or wondering about the right ceiling fans direction for winter, this guide walks you through everything you need to know.
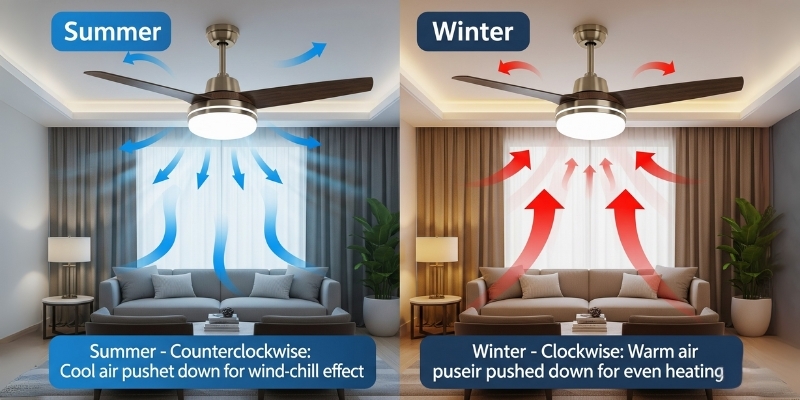
Unlike air conditioners that consume heavy amounts of energy, Ceiling fans are incredibly efficient. They don’t actually cool a room; instead, they create airflow that makes you feel cooler by helping evaporate perspiration. In winter, reversing the ceiling fan direction helps redistribute warm air, saving on heating costs. That means you get year-round comfort at a fraction of the energy bill.
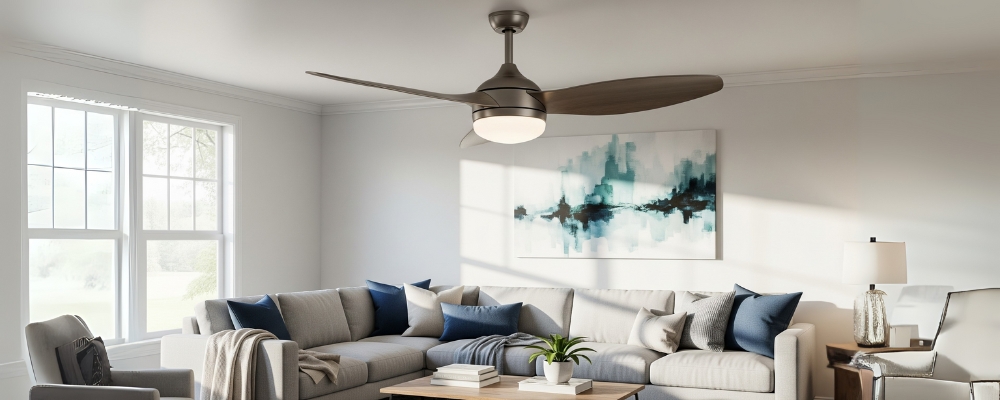
But fans aren’t just about function anymore—they’ve become design elements. From a sleek black ceiling fan that anchors a modern living room to a white ceiling fan with light that blends into minimalist décor, the options are endless.
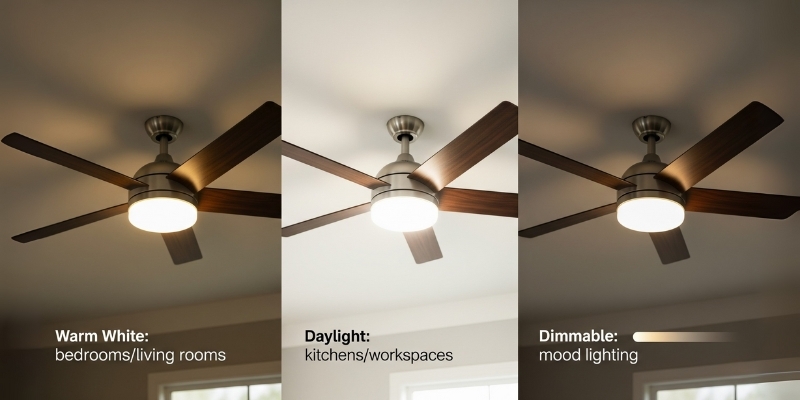
Adding ceiling fan light lights is one of the easiest ways to make your fan do double duty. Fans with integrated lighting save ceiling space and provide both airflow and illumination from one fixture. For homes that already have fans, a ceiling fan light kit is a smart upgrade.
The best part? You can choose the right ceiling fan light bulbs depending on your needs. Warm-toned bulbs create cozy moods in bedrooms, while bright daylight bulbs are perfect for kitchens or offices. Some fans even support dimmable ceiling fan bulbs, giving you total control over brightness.
If your ceiling height is on the lower side, a traditional fan might not be safe or practical. That’s where low profile ceiling fans and flush mount ceiling fans come in.
Both options are proof that you don’t need high ceilings to enjoy the benefits of a ceiling fan.
One of the most useful but overlooked features of a fan is its reversible motor. Changing the direction can make a surprising difference in comfort and energy savings.
This simple adjustment means your ceiling fan works for you all year long—not just on hot days.
Spending evenings on the patio or in a sunroom feels even better with an outdoor ceiling fan with light. These fans are built to withstand moisture, humidity, and changing weather conditions. They not only circulate air but also keep bugs at bay by disrupting their flight patterns.
Pair them with energy-efficient ceiling fan light bulbs that are rated for damp or wet locations, and you’ll have a comfortable, well-lit outdoor space perfect for entertaining or relaxing.
Learning how to install a ceiling fan might sound intimidating, but with the right preparation, it’s a manageable DIY project. Here’s a simplified step-by-step process:
While handy homeowners can handle installation, if wiring feels overwhelming, it’s always safer to call a licensed electrician.
The traditional pull-chain fan is still around, but modern fans offer much more convenient options. A ceiling fan switch can now mean a wall-mounted control, remote, or even smart integration through apps and voice assistants. With these upgrades, you can control fan speed, lighting levels, and even scheduling—all without leaving your seat.
Not all fans are created equal, and choosing the right one comes down to a few factors:
It’s easy to overlook the type of bulbs in your ceiling fan, but they play a huge role in both lighting quality and energy efficiency. Today, LED ceiling fan light bulbs are the most popular because they last longer and use less power.
Replacing ceiling fan bulbs is simple—just check your fan’s manual for wattage and bulb type compatibility.
Beyond function, ceiling fans have become interior design statements. From farmhouse-style wood finishes to sleek metallic designs, there’s a fan for every aesthetic. For instance:
Think of a ceiling fan as both a utility and a décor piece—it completes the look of a room while keeping it comfortable.
Ceiling fans remain one of the smartest and most stylish ways to keep your home comfortable year-round. They save energy, provide versatile lighting, and add character to any space. Whether you’re looking at low profile ceiling fans for tight spaces, an outdoor ceiling fan with light for the patio, or simply figuring out how to install a ceiling fan in your bedroom, there’s an option that suits every home.
AQ Lighting is your one-stop shop where you’ll find a wide range of ceiling fans that blend efficiency with style. From ceiling fan switches to ceiling fan bulbs, we provide everything you need to create a comfortable and inviting space.
Turn off power, mount the bracket to a ceiling joist, connect the wiring, attach blades and light kit, then test the fan. If unsure, hire an electrician.
In summer, set the fan to spin counterclockwise so it pushes cool air down and creates a refreshing breeze.
Choose the right fan size for your room, secure the mounting bracket, connect the wiring, and attach the fan body and blades.
Turn off electricity, secure the mounting bracket, wire the fan to the ceiling wires, attach blades, and test. Always follow the manual.
Switch off power, remove the old fan, disconnect wiring, install the new bracket, connect wires, and mount the new fan.
Counterclockwise, to push air downward and make the room feel cooler.
Counterclockwise, creating a wind-chill effect to help cool the room.
Your fan should spin counterclockwise in summer to circulate cool air effectively.
Set the switch to counterclockwise in summer and clockwise in winter for proper airflow.
Tighten blade screws, measure blade height from ceiling, and use a balancing kit if wobbling continues.
Measure the blade span—distance across the circle of blades. For odd blade counts, measure from the center to one blade tip and double it.
It should turn counterclockwise to push cool air down.
Counterclockwise, to create airflow that cools the room.
Clockwise, at a low speed, to circulate warm air trapped near the ceiling.
Measure the blade span from tip to tip of opposite blades (or center to tip × 2 for odd blades).
Turn off the breaker, remove the old fan, disconnect wires, mount the new bracket, reconnect wiring, and install the new fan.
For small bedrooms (up to 75 sq ft), use a 29–36 inch fan. For medium rooms (76–144 sq ft), 36–42 inches works. For larger bedrooms, 44–52 inches is ideal.