


*DISCLAIMER*
10 Watt Maximum! Using a Bulb Higher than 10 Watts Can Result in Overheating and Potential Damage to the Fixture
Note: The included driver for this kit allows dimming for ONLY Halogen Bulbs. For dimming LED bulbs, you will need a different driver. Please call 800-865-7221 for more details.
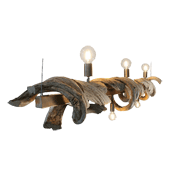
3 halogen puck light kit takes traditional halogen lighting and combines it with easy surface mounting installation for the perfect under cabinet kitchen lighting system. Able to mounted to just about any surface or in a recessed capacity, these puck lights are designed to be plug-and-play. The transformer plugs directly into any regular wall socket and connects directly to each of the 3 puck lights to create a string of circular lighting with its hammerhead full cup reflector. Compatible with AQL's supply of JC Bi-Pin LED light bulbs, you have the ability to achieve high energy savings for your kitchen. Contact the AQL sales team to see what our LED technology can do for you. Included with the kit is 60w plug in electronic transformer to power your system, which features a 6' cord. Upgrade to our LED bulb options for even better illumination and energy-savings.
-

Tried and True Lighting
The HU2 features traditional halogen light bulbs to create wide areas of inviting lights. Powered by 10w halogen JC Bi-Pin light bulbs and paired with our smooth reflector, all the light from each bulb is directed downwards to increase the maximum light output of the system.
-

Surface Mounting Cup
Mounting cup features 2 knockouts for different wiring options and comes with 2 mounting screws for cabinet and surface installations. Remove the cup from the bottom of the puck and mount to the desired surface with the included screws, then snap the puck back into the mounting cup after feeding the wiring through the side knockouts.
-

LED Bulbs
Choosing an LED bulb for your puck light is an ideal choice for modern and efficient lighting. This option will ensure long lasting brilliance at low energy costs.
-

Halogen Bulbs
With LED bulbs taking over the lighting scene, the materials used by lighting manufacturers typically don't account for the heat produced by traditional halogen bulbs anymore. This means using a halogen bulb with a modern fixture could potentially damage or melt the materials that house the bulbs. This puck light only supports halogen bulbs with a max wattage of 10W, anything greater could potentially melt the glass lens.
Puck Specifications
| Material | Die-Cast Aluminum Body |
| Voltage | 12V |
| Socket Type | UL Certified JC Bi-Pin (E230758) |
| Power Rating | 10w Max |
| Bulb Temperature | Clear Halogen |
| Diffuser | Clear Tempered Glass Lens |
| Mounting | Surface/Recessed Mounted |
| Wiring Lengths | 10" Lead Wire per Puck |
 Specification Sheet
 Dimensions

Transformer Specifications
| Transformer Type | Halogen Class 2 |
| Input Voltage | 120V AC 60Hz 0.63A |
| Output Voltage | 11.5V 6.5A |
| Capacity | 60w Max |
| Wire Length | 6' Power Cord / 5" Lead to Connector |
| Certifications | UL Listed / Dry Locations Only |
Surface Applications
- Remove the mounting cup and pull out the front lens assembly unit.
- Using the supplied screws, mount the mounting cup on the panel and run the wire through the channel at the bottom of the mounting cup before the unit is attached in place. Pull wires at the same time while pushing the unit into the mounting cup
- If the wires are to be hidden behind the panel, drill a 3/4" hole to allow the connector to go through, secure the mounting cup with the screws supplied and insert the unit back in.
- Use the supplied connector with every puck light to connect the unit to the transformer. Harness and press the connector until it locks.
- Using the double-sided tape provided, attach the transformer to the desired location
- The in-line switch supplied can be installed on the wire going from the transformer to the plug.
- Plug the transformer into the power outlet
Recessed Applications:
- Drill a 2 1/4" diameter hole in the desired location.
- Remove and dispose the mounting cup supplied
- Insert the wire and the connector to the hole and push in the puck light assembly until the unit is flush with the panel.
- Use the supplied connector with every puck light to connect the unit to the transformer. Harness and press the connector until it locks
- Using the double-sided tape provided, attach the transformer to the desired location.
- The in line switch can be installed on the wire going from the transformer to the plug.
- Plug the transformer into the power outlet
Electrical:
- The Class 2 transformer has a maximum load of 60 watts
- Connect all the puck light connectors to the multi-tap hub
- Press the connector until it snaps into place
- Connect the transformer to power
- Do not install this product on aquariums or plastic cabinets
- Check to make sure that they system wiring does not interfere with existing wiring
- These units product extreme heat that might affect the specific finish of the mounting surface
- Power should be disconnected and the bulb should be cool before replacing the lamp or touching the lens, guard or enclosure
- Remember: this lighting fixture is HOT! The bulb gets hot very quickly!
- Avoid looking directly into the lamping
- Distance the fixture from any combustible materials
- Avoid contact with the bulb at any time. Use a soft cloth when touching the bulb. Oil from skin contact can damage the bulb
- The puck light should not be operated if the lens is missing or damaged
A qualified personnel is intended to install this equipment. The installation must be made in accordance with the current edition of the National Electrical Code and all applicable state and local building codes. The appropriate, qualified electrical / building inspector(s) must approve the final installation. Improper installation may result in a fire or electrical hazard. Be sure to disconnect the electrical power to the circuit before installing this electrical system.
The Reliable Partner For All Your Lighting Needs.
+40 Year Experience
With over 40 years of lighting expertise, we focus in providing the best customer experience and great quality products
Shipping & Quickship
Free Shipping on items over $100 and Quickship for selected items placed by 1pm PST ship same day.
Stress Free & Easy Returns
We provide a 30-day, stress free return and exchange policy on the majority of our products


