
Is your property leaving potential customers in the shadows? Poorly planned landscape lighting can quietly impact visibility, curb appeal, and even safety. For builders and contractors, lighting is more than decoration. It is a strategic element that influences property perception, security, and long-term value. Pre-construction planning ensures your landscape lighting not only enhances aesthetics but also meets functional needs efficiently.
This guide walks builders, contractors, and landscape lighting installers through the key considerations, strategies, and best practices for pre-construction landscape lighting planning.
Planning landscape lighting before construction begins delivers multiple benefits:
For contractors and builders, thoughtful pre-construction planning saves time, reduces costs, and ensures client satisfaction.

Before selecting fixtures or wiring systems, clarify your objectives:
Establishing these goals ensures your landscape lighting plan aligns with client expectations and long-term property value.
Choosing the proper lighting system is critical. Consider these options:
Selecting the right combination of fixtures ensures balanced illumination and professional results.
Early design is crucial to avoid costly adjustments later. Follow these key principles:
Engaging a professional landscape lighting designer or installer during the planning stage ensures a precise, code-compliant layout.

Low voltage landscape lighting depends on properly sized transformers:
Correct transformer sizing prevents flickering, burnout, or voltage drop issues.
Even the best landscape lighting requires occasional attention. Pre-construction planning should account for:
Planning for maintenance ensures long-term functionality and client satisfaction.
Compliance with local electrical codes and safety standards is critical:
Following safety guidelines reduces liability and ensures a reliable installation.

Modern landscape lighting is not just decorative; it can be energy smart:
Energy-efficient lighting improves ROI for clients and aligns with sustainable building practices.
Pre-construction landscape lighting planning requires collaboration:
Proper coordination minimizes project delays and ensures seamless integration.
Create detailed schematics and installation instructions:
Well-documented plans simplify installation and future service.

Even with thorough pre-construction planning, final testing is essential:
Fine-tuning ensures the lighting plan meets design goals and functional requirements.
Pre-construction landscape lighting planning is essential for professional, functional, and visually appealing outdoor spaces. By carefully considering goals, fixture selection, layout, transformer sizing, safety, energy efficiency, and maintenance, contractors can deliver installations that impress clients and stand the test of time.
Whether using low voltage landscape lights, landscape lighting kits, or custom designer solutions, proper planning maximizes performance and minimizes costly retrofits. Explore the AQ Lighting collection to find reliable, high-quality landscape lighting fixtures designed for easy installation and lasting results.
Install low voltage or LED fixtures according to the manufacturer instructions. Plan fixture locations, dig shallow trenches for wiring, connect to the transformer, and test before backfilling. Always follow local electrical codes.
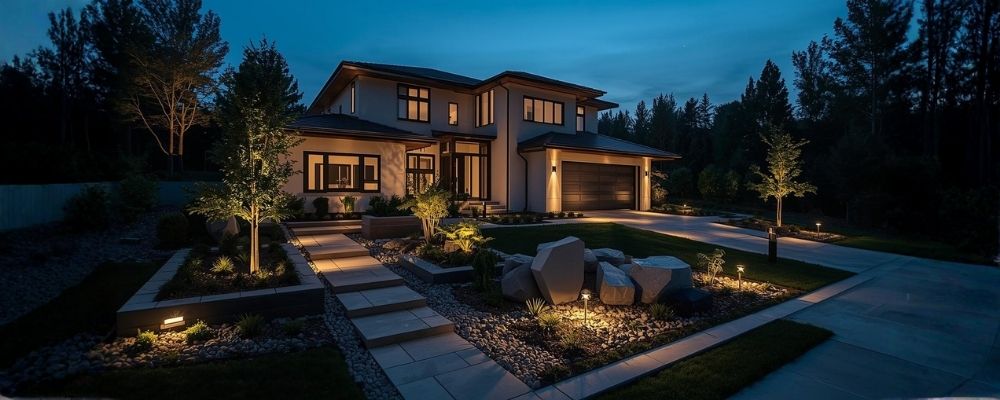
Start by mapping out pathways, garden beds, architectural features, and focal points. Decide on zones (safety, accent, decorative), choose fixture types, and calculate wattage and transformer requirements to ensure balanced, efficient illumination.
Lay out the lighting plan, run low voltage cable along the designated paths, attach fixtures, and connect them to a compatible transformer. Test each fixture and use wire connectors rated for outdoor use.
Yes, many DIY-friendly kits are available. Use low voltage systems, follow layout plans, and ensure safe connections. However, for large properties or complex designs, professional landscape lighting installers are recommended.
Run low voltage cable from the transformer to each fixture, using connectors or waterproof wire nuts. Keep cables buried 2–6 inches below grade or inside conduit where required. Maintain proper voltage to avoid dimming or flickering.
Place lights along walkways, driveways, steps, and entrances for safety. Highlight trees, shrubs, water features, and architectural elements for aesthetics. Avoid pointing lights directly into windows or neighboring properties.
Choose kits that include a transformer, pre-wired fixtures, and all necessary connectors. Kits with adjustable fixtures, timers, or photocells provide flexibility for different landscape zones.
Spacing depends on fixture type and brightness. Pathway lights are typically spaced 6–10 feet apart. Accent lights may require closer placement for small features or trees. Always test at night to confirm even illumination.
Solar landscape lights are usually standalone and do not connect to low voltage wiring. They are best for areas without electrical access, but their brightness and runtime may vary based on sunlight availability.
Calculate the total wattage of all fixtures and add a 10–20% buffer. Select a transformer rated for outdoor use, compatible with timers or photocells, and able to handle multiple zones if required.